Here’s a simple stretch goal if you have 30 minutes left at the end of the lab and would like something additional to do. Use Powershell to set up the load balancer in Virginia. The steps are similar to using the CLI in Amsterdam. This will not be step-by-step instructions, we expect you to do this with little guidance however we have added the complete setup script at the bottom if you need it. Use the diagram and the numbered notes below:
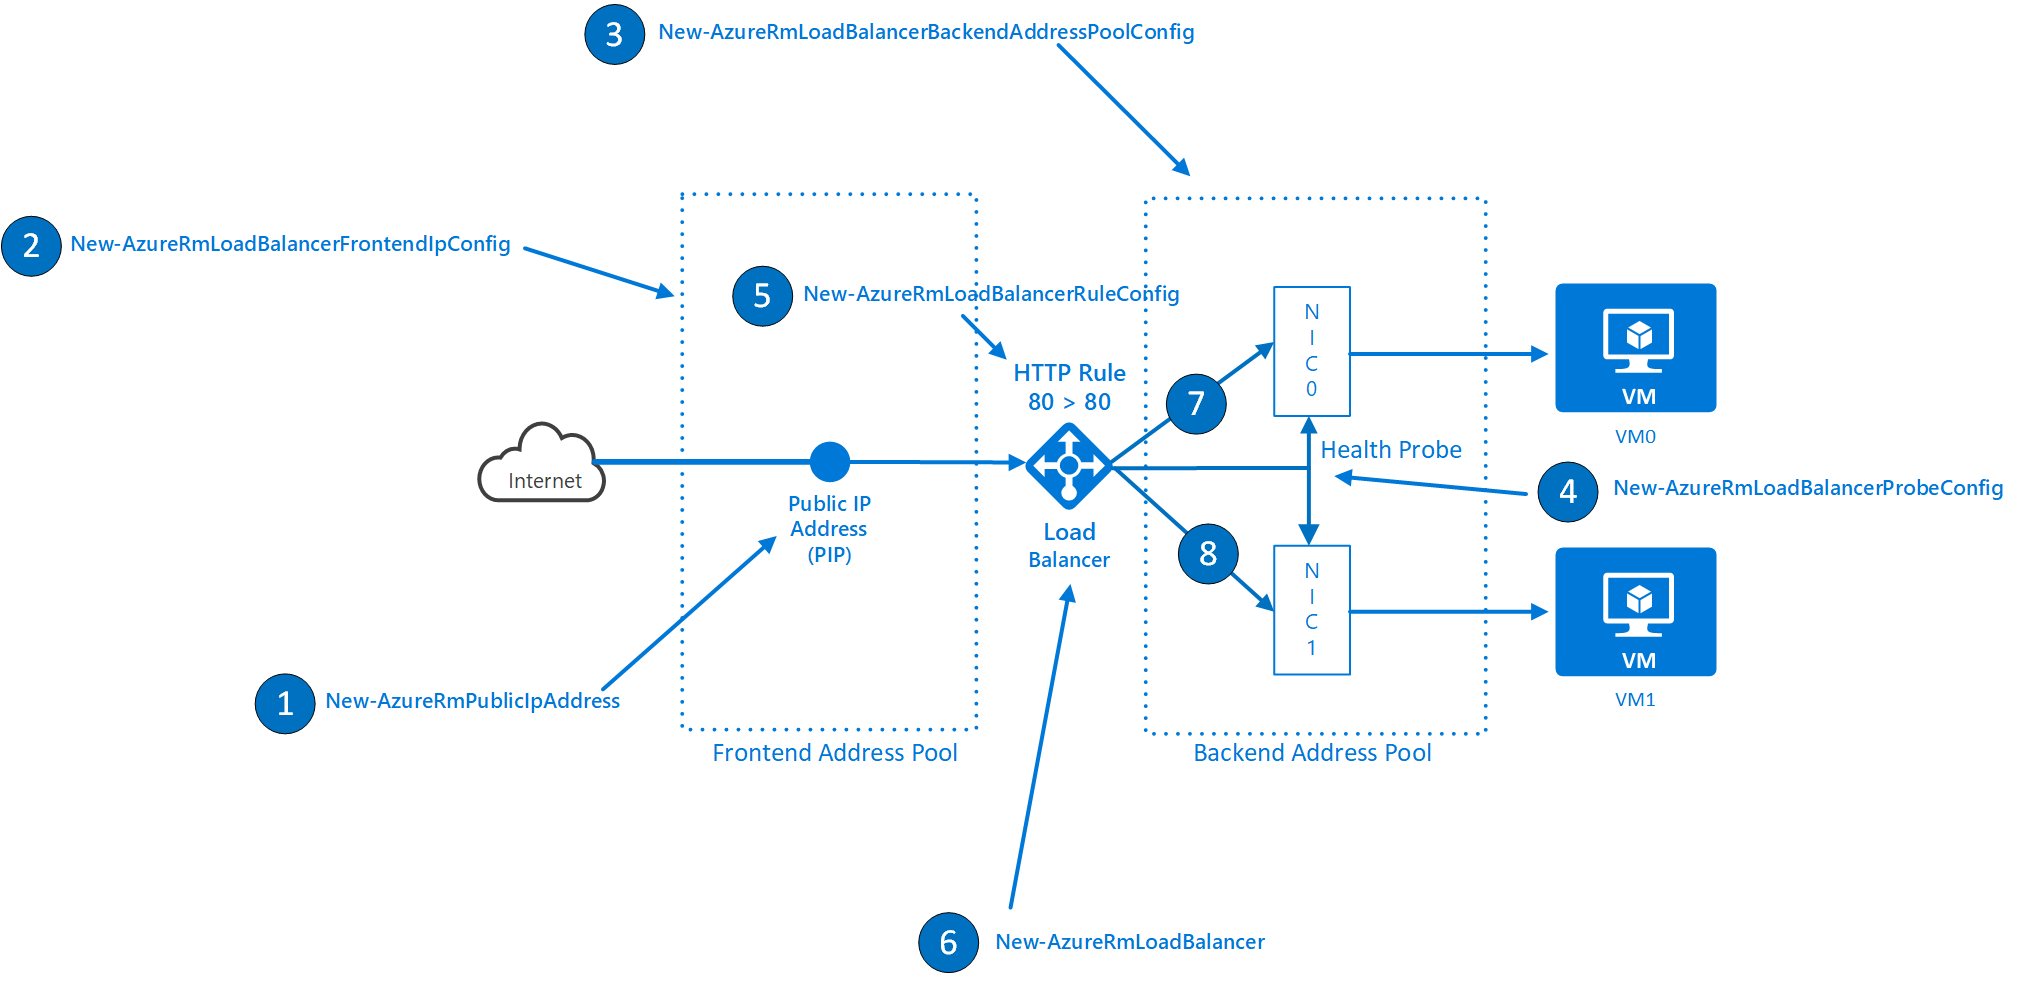
- Create the PIP
- Create the Frontend Address Pool
- Create the Backend Address Pool
- Create the Health Probe
- Create the Load Balancer Rule
- Create the Load Balancer
- Associate the 1st NIC with the Backed Address Pool
- Associate the 2nd NIC with the Backend Address Pool
- Test it.
You’ll also need to install IIS on to the other VM in Virginia, and decorate the homepage so you know which one is responding when you test it out.
First you need to connect Powershell to Azure. You can do this with the following command:
Connect-AzureRmAccount
Set your subscription with the following command:
Select-AzureRmSubscription -Subscription SUBID
I’ll get you started with the first few Powershell commands you need, but you can look up the help (or just use Intellisense in Powershell ISE) on the parameters and switches yourself.
-
Create the PIP:
New-AzureRmPublicIpAddress -
Create the Frontend Address Pool:
New-AzureRmLoadBalancerFrontendIpConfig -
Create the Backend Address Pool:
New-AzureRmLoadBalancerBackendAddressPoolConfig -
Create the Health Probe (hint – a TCP probe is simpler):
New-AzureRmLoadBalancerProbeConfig -
Create the Load Balancer Rule:
New-AzureRmLoadBalancerRuleConfig -
Create the Load Balancer (hint – you’ll need to have created the Frontend Address Pool, Backend Address Pool, Load Balancer Rule and Health Probe before you create the Load Balancer):
New-AzureRmLoadBalancer (pipe it into Set-AzureRmLoadBalancer) -
Use
Get-AzureRmLoadBalancerBackendAddressPoolConfigbecause you can specify the name of the Load Balancer. There’s also a minor problem: the creation of the Load Balancer zeroes out the ID in the$beaddresspoolvariable. Who knows why! But re-assigning the variable withGet-AzureRmLoadBalancerBackendAddressPoolConfigfixes the problem.
Get-AzureRmLoadBalancerBackendAddressPoolConfig
When using the above cmdlets – you’ll need to feed their output into Powershell Object Variables and you’ll then feed those variables in to the cmdlets. For example, the first command will be something like:
$VirgLBpip = New-AzureRmPublicIpAddress -Name VirgLBpip -ResourceGroupName rgVirginia -Location eastus -DomainNameLabel virglbdns –AllocationMethod Dynamic
You can see $VirgLBpip becomes a variable you’ll use later when you create the Load Balancer.
This diagram shows the order you need to do things:
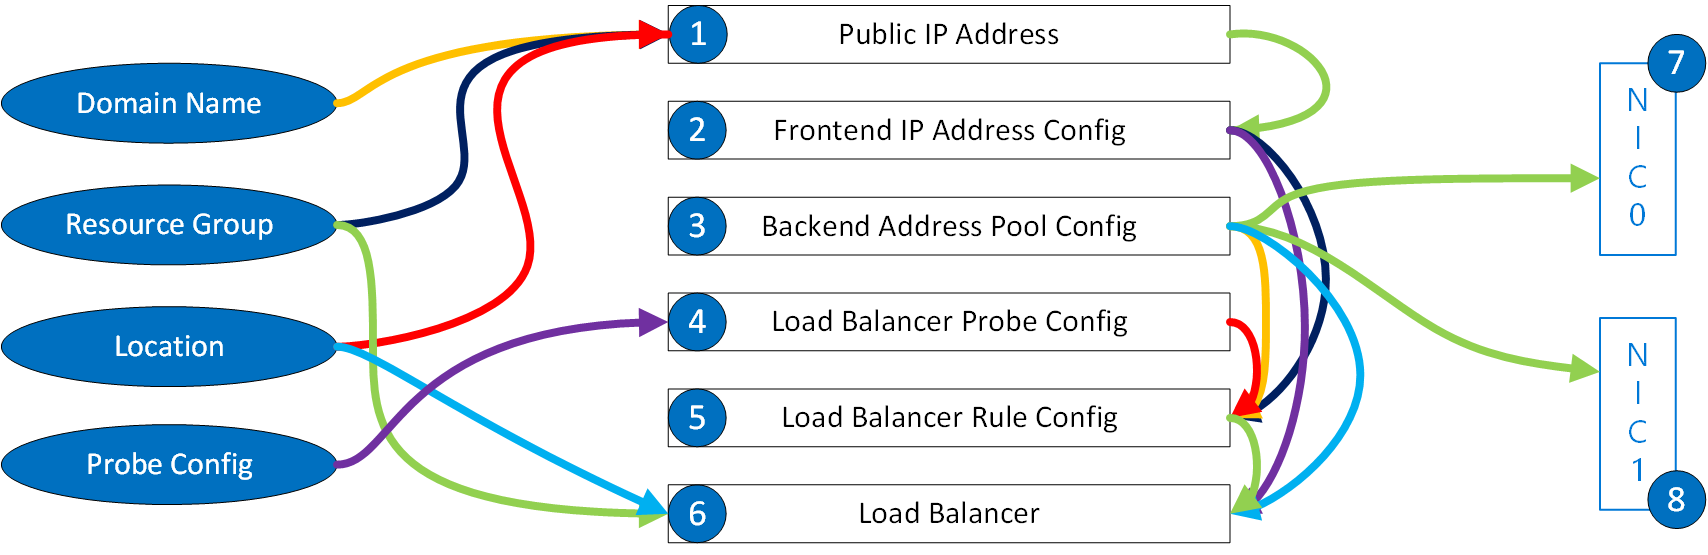
- Create the PIP
- Create the Frontend Address Pool
- Create the Backend Address Pool
- Create the Health Probe
- Create the Load Balancer Rule
- Create the Load Balancer
- Associate the 1st NIC with the Backed Address Pool
- Associate the 2nd NIC with the Backend Address Pool
Regarding the association of the NICs with the backend address pool; there are more gymnastics in achieving this with Powershell than there are with the CLI.
-
You’ll notice when you create the Load Balancer (you need to pipe it in to
Set-AzureRmLoadBalancer), it zeroes out the Backend Address Pool. So you need to “Get” it after Load Balancer creation withGet-AzureRmLoadBalancerBackendAddressPoolConfig. -
I’ll give you the whole string of commands for the first NIC and you work it out for the second NIC – is that a deal? Here goes; firstly the “elegant” way (this assumes you have fed the output of
New-AzureRmLoadBalancerBackendAddressPoolConfiginto a variable called $beaddresspool ). In the CLI, the NIC is treated as a “standalone” object. Not so in Powershell. You have to drill inside the VM and retrieve a property calledNetworkInterfaces[0].Id.# Let's imagine with this NIC, we don't know the name of the NIC. # But we do know the name of the VM it's attached to. In that case we can drill in to the config to find it ($nicResource.Name). $vm = Get-AzureRMVM -ResourceGroupName rgVirg -Name virgVM0 $nicResource = Get-AzureRmResource -ResourceId $vm.NetworkProfile.NetworkInterfaces[0].Id $Nic = Get-AzureRmNetworkInterface -ResourceGroupName rgVirg -Name $nicResource.Name # indirectly referencing the NIC ($nicResource.Name). $Nic.IpConfigurations[0].LoadBalancerBackendAddressPools = $beaddresspool Set-AzureRmNetworkInterface -NetworkInterface $NicNext is something a little more “scrappy”, can you spot the overlap?:
# Next bit is tricky. We need to drill down into the VM's array of NICs and get that before we can associate it with the Backend Address Pool. # You don't configure the address pool to hold the NICs, you do it the other way round: you tell each NIC which Back End Address Pool it's # a member of. # We know what NIC we're talking to (vmvirg145) so the first way of doing it is just to supply the NIC name directly $Nic = Get-AzureRmNetworkInterface -ResourceGroupName rgVirg -Name vmvirg145 # directly referencing the NIC (vmvirg145) $Nic.IpConfigurations[0].LoadBalancerBackendAddressPools = $beaddresspool Set-AzureRmNetworkInterface -NetworkInterface $Nic -
Associate the 2nd NIC with the Backend Address Pool.
-
Alternatively – I give you the entire Powershell Script here, you may need to change the parameters to match yours (but try to figure it out first!):
$virgLBpip = New-AzureRmPublicIpAddress -Name VirgLBpip -ResourceGroupName rgVirg -Location eastus -DomainNameLabel virglbdnsqq –AllocationMethod Dynamic $frontendIP = New-AzureRmLoadBalancerFrontendIpConfig -Name LB-Frontend -PublicIpAddress $VirgLBpip $beaddresspool = New-AzureRmLoadBalancerBackendAddressPoolConfig -Name LB-backend $healthProbe = New-AzureRmLoadBalancerProbeConfig -Name HealthProbe -Protocol Tcp -Port 80 -IntervalInSeconds 30 -ProbeCount 4 $lbrule = New-AzureRmLoadBalancerRuleConfig -Name HTTP -FrontendIpConfiguration $frontendIP -BackendAddressPool $beaddresspool -Probe $healthProbe -Protocol Tcp -FrontendPort 80 -BackendPort 80 $VirgLB = New-AzureRmLoadBalancer -ResourceGroupName rgVirg -Name VirgLB -Location eastus -FrontendIpConfiguration $frontendIP -LoadBalancingRule $lbrule -BackendAddressPool $beaddresspool -Probe $healthProbe | Set-AzureRmLoadBalancer # Need to re-assign $beaddresspool because passing it in to New_AzureRmLoadBalancer (the line immediately above) zeroes it out. $beaddresspool = Get-AzureRmLoadBalancerBackendAddressPoolConfig -Name LB-backend -LoadBalancer $VirgLB # Next bit is tricky. We need to drill down into the VM's array of NICs and get that before we can associate it with the Backend Address Pool. # You don't configure the address pool to hold the NICs, you do it the other way round: you tell each NIC which Back End Address Pool it's # a member of. # ...we know what NIC we're talking to (vmvirg0837) so the first way of doing it is just to supply the NIC name directly $Nic = Get-AzureRmNetworkInterface -ResourceGroupName rgVirg -Name vmvirg0837 # directly referencing the NIC (vmvirg0837) $Nic.IpConfigurations[0].LoadBalancerBackendAddressPools = $beaddresspool Set-AzureRmNetworkInterface -NetworkInterface $Nic # ...let's imagine with this NIC, we don't know the name of the NIC. # but we do know the name of the VM it’s attached to. In that case we can drill in to the config to find it ($nicResource.Name). $vm = Get-AzureRMVM -ResourceGroupName rgVirg -Name virgvm1 $nicResource = Get-AzureRmResource -ResourceId $vm.NetworkProfile.NetworkInterfaces[0].Id $Nic = Get-AzureRmNetworkInterface -ResourceGroupName rgVirg -Name $nicResource.Name # indirectly referencing the NIC ($nicResource.Name). $Nic.IpConfigurations[0].LoadBalancerBackendAddressPools = $beaddresspool Set-AzureRmNetworkInterface -NetworkInterface $Nic -
Test the load balancing features out. Open a browser and go to <load balancer pip DNS name>.eastus.cloudapp.azure.com. If you used the completed script above without changing all the variables the DNS name is: virglbdnsqq.
-
You can now set the Traffic Manager to use the Load Balanced PIP for Virginia. Go to your Traffic Manager settings. Under Endpoints select your Virginia Endpoint then change the Target resource to your new load balanced PIP. Hit Save and you are done!
Congratulations on completing the stretch goal! We hope you enjoyed it!