-
In the left-hand blade – click Resource groups and click the Resource group for Amsterdam.
-
On the Settings blade, click Export Template.
There’s a possibility you’ll get an error saying the extension is not saved or that certain resource types cannot be exported. You can safely ignore these errors. The export functionality sometimes lags behind the functionality of the resources themselves. It will eventually catch-up.
-
The template blade has a split screen view. Use the navigation section on the left to explore the parameters, the variables (this section will be empty) and the resources. There’s no need to gain an intimate understanding, just familiarise yourself with what these things look like.
-
However - we are not going to download a template from the portal, we are going to use a pre-built template today. This is because the template that’s downloaded is missing some parameters and it’s fiddly to add it back in.
-
Download the template here.
-
Navigate to the saved zip folder and extract it.
-
You can see the following inside the folder:
- Powershell script – you can (and will) use this to deploy the template.
- Bash script – if you are running on a platform that supports Bash such as Linux (or WSL), you can use this script to deploy.
- Ruby script – if you use Ruby you can use this script to deploy.
- A C# helper class called DeploymentHelper. You can use this class in your own code to deploy your template.
- A template file – you’ve already explored this file a little in the portal. You will make a couple of edits to this file soon.
- A parameters file – you will edit this file with names suitable for use in Virginia (for example VirgVM0 instead of AmsVM0) which you will pull from the naming conventions table for Amsterdam and its 2 VMs.
-
Open the template file in Visual Studio Code. Right click on the file then click Open With Code.
-
Open the parameters file in Visual Studio Code as well and take a look at it. Notice it highlights the parameters. The red text shows you the data type it is expecting (string for all these parameters) and in some cases, a default value. Each section between the “},” brackets is a key-value pair.
The key names in this template are based on the previous resources from the Amsterdam region. For example “availabilitySets_amsavailset_name” shows its an availabilty set, with the name amsavailset. _name is appended at the end of each key.
A limitation of exporting a template (which is derived from the configuration you provided as you created all the different resources in the portal) is that Azure doesn’t have a human understanding of your intentions. So it can only create what it has limited knowledge of. But this is good enough for our purposes in this lab.
-
We need to make a couple of changes to the template file, so make sure you are working on the template in Visual Studio Code. Firstly, we need to change the server logon name, which is hard-coded into the template.json. If you do a search for “vmadmin” (Press Ctrl+F to bring up the Find menu), this will find the server logon name. It will appear twice, once for each server. Change both instances to your own server logon name and put this in your naming conventions file.
-
All the infrastructure you deployed in the previous example was in Amsterdam and the template reflects that. Now do a global search-and-replace, replacing westeurope with eastus so that everything is built in Virginia. To do this:
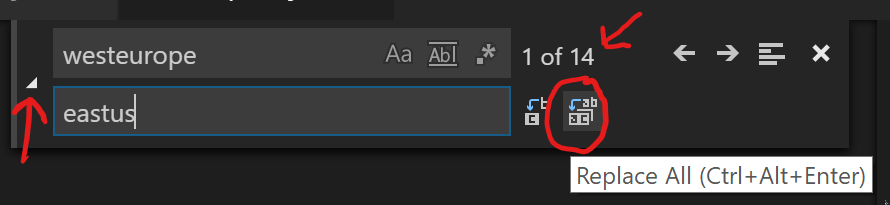
- With Visual Studio Code open. Press Ctrl+F and the search box should appear in the top right. Click the arrow left of Find to show the Replace option.
- In the upper box type westeurope. In the lower box type eastus. Click the Replace All button (Ctrl+Alt+Enter):
-
Acknowledge that 14 replacements took place.
-
Close the templates file, ensuring you save your changes.
-
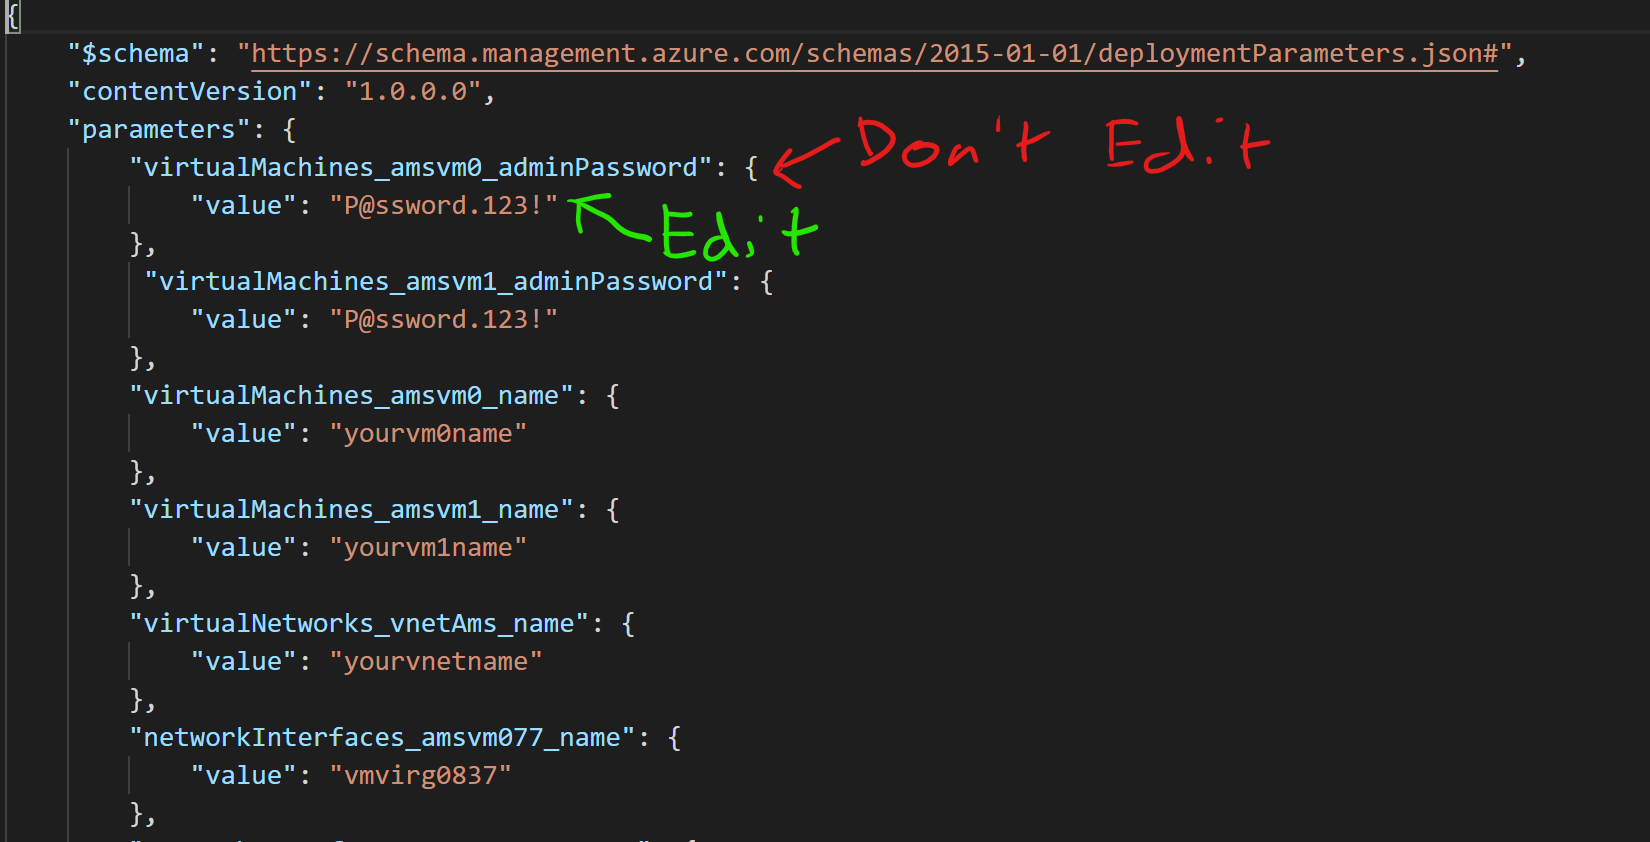
Open the parameters file in Visual Studio Code. You will now visit each section in the parameters file and enter new names that are suitable for infrastructure deployed to Virginia. The parameter file is currently pre-filled with examples for each value. Now go down through the file inserting names (in double quotes – for example “vmvirgvm0bemcgarry”) that maintain the naming convention you started in Amsterdam. Do not change the Parameter names, just change the values within the quotation marks.
Note: Avoid the use of capital letters in resource names, some resources are case sensitive and the template will fail deployment if capital letters are used. For the VM names try to keep them under 15 characters as there is a set limit on how long they can be.
IMPORTANT: For the schedules_shutdown_computevm parameters, change the yourvm0name part to the VM names you have chosen respectively for both keys.
DO NOT EDIT THE BOTTOM 3 PARAMETERS IN THE FILE - These are needed to deploy and should not be modified. Doing so may cause deployment failure.
Notice you get more control with Azure Resource Manager templates than the portal gives. You can edit the names of the NICs for example.
-
Go through the file carefully and make sure you have exactly the right number of double quotes for each string you entered. Intellisense can be a little too helpful sometimes 😊
-
Exit Visual Studio Code ensuring you save the file.